I have eaten a lot of pizza and tried a lot of different recipes since living in Italy. This isn’t some revolutionary recipe and I’m by no means an expert but I am thorough in my research; I made modifications and prepared this recipe 10 times this month; and I have spoken to a lot of Italians over the past 10 years for tips and tricks.
In spite of my high level of comfort with baking and cooking in general, I have had pizza fails with some people’s recipes so I’ll put as many hints below as I can think of to ensure your pizza is a mouthwatering success. As I explained in the video below, my dream pizza is light but with a high crust, crisp but chewy, modelled on la pizza Napoletana but good enough to make in a tiny oven that only reaches 200 degrees Celsius.
The chewiness is the key for me. After all, if I wanted a totally crispy pizza, I would just throw some tomato sauce and cheese on a circle of pita bread. What I desire is that delicious depth of flavour, crisp outer and soft inner that one finds in the best Italian pizzerie. There’s nothing worse than a bad pizza. If you’re going to indulge and not be worried about the carbs you want it to be a euphoric experience. And trust me, you can even find bad pizza in Italy. Not so much in the toppings as Italians understand the beauty of keeping things classic and simple. But sometimes I have ordered Neapolitan pizza only to be heartbroken at the sight of them serving up a more Roman-style pizza, which is kind of like cardboard (sorry, Roma) or just one soggy mess with no soul-affirming crunch*.
*see (or rather, listen to) time stamp 14:52 of the video
Try really really hard to anticipate your pizza craving and organise it into your week so that you are preparing this on a Thursday night so it is ready to cook on a Friday when you come home exhausted and celebratory and ready to indulge. We tend to talk about pizza as this guilty pleasure because one can often feel heavy and bloated afterwards, but this needn’t be the case if you’re willing to wait for your dough with a slow rise. Someone explained to me that giving the yeast time to rise and expand as dough for a day beforehand, saves it from expanding in your stomach when you eat it – which is both a little unsavoury to think about and yet quite incentivising. 🙂
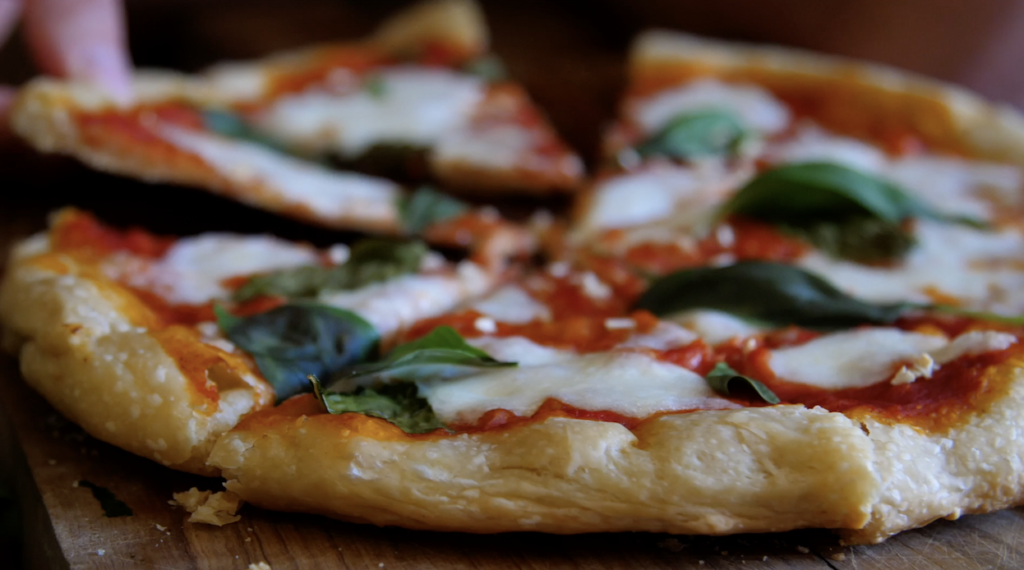
Sorry, WordPress is not letting me upload any images right now but you can see plenty of delicious pizza shots in the video!
INGREDIENTS: (makes 2 medium pizzas)
500 grams 00 flour
5 grams fresh yeast (I’ll talk to you about dry yeast below)
300ml room temperature water halved into two separate cups
1 large teaspoon of honey or brown sugar
10 grams (or a big pinch) of fine sea salt
2 tablespoons olive oil (plus more for oiling your bowl)
approx 500 grams tomato passata (sauce)
2-3 large mozzarella balls (each one should be the size of a fist)
fresh basil
METHOD:
- Dissolve your fresh yeast in HALF the water. I explain in the video that holding back half your water gives you room to adjust the amount of liquid because rectifying a dough that is too watery can be problematic and even if you follow this recipe perfectly, every brand of flour and climate is different so we will all need slightly different amounts of water. If judging for yourself worries you, fear not and just use the amounts I’ve listed. Some say to use warm water but don’t go crazy trying to get it perfect – you’re more likely to do harm to yeast using water that is too hot than using water that is too cold. Plus the long rising time we’re giving this means we don’t need the warmth here as much as those cooking it on the same day. Fresh yeast also improves the flavour so do try to find it. If you can’t, you can use 2 grams of dry yeast and be sure to wait for about 5-10 minutes after dissolving to see if it bubbles up to confirm that the dry yeast is still good to use. You don’t want to got to all this trouble only to find your yeast isn’t activated. If it doesn’t bubble, throw it out and start again.
- Mix in either honey or brown sugar. Yeast likes sweetness so this won’t really flavour your crust, it’s more about helping our temperamental little friend yeast to do his best work.
- In a large bowl pour your flour and this is a good time to put on a podcast before your hands get sticky.
- Pour the dissolved yeast, water and sugar/honey mixture into the bowl with the flour. REMEMBER, you should still have 150ml of water in a separate cup waiting to enter the scene later. I like to mix the yeast water into the flour with my finger tips. (Look at the part of the video where I show you what it should look like at this stage.)
- Now that the yeast has its friend flour to defend it, we can add the salt – another enemy of yeast, which can kill its bubble-making powers.
- Mix in the two tablespoons of olive oil.
- Now gradually add a little water at a time, mixing the flour with your fingers until it becomes a rough but compact ball of dough. I put two different shots in the video so you can check what it should look like. When asking yourself how much water to add, just keep rolling it around into a ball and essentially, when it all comes together like that it means you should have enough moisture. There’s not too much harm in adding all the 150ml and I made many successful pizzas with quite a wet dough, but I find that sometimes if you’re not used to making pizza it can be overwhelming working with a really sticky dough so I’m trying to make your life a little easier.
- Now we want to knead our dough until we get a smooth texture (again, see the video). You will feel when the dough gets that lovely soft elasticity. All the flour should be mixed in and you shouldn’t even need to flour your work surface too much, if at all. I often like to knead in the bowl, as I said in the video, but that’s only so I can work at my computer while I’m kneading. Other times I like the physical workout of throwing my whole upper body into kneading on a table or benchtop. It’s such good exercise to have your arms in sustained strenuous activity for 15 minutes nonstop.
- Once your dough is smooth, pour some olive oil over the inside of your bowl to give the dough the freedom to rise up easily, cover with cling film, and leave it to rest in a warm place for about two hours. If you’re looking for a warm but not hot resting place, you can leave it in the oven with the light on but no heat, which should give it a temperature of about 28 degrees Celsius.
- After a couple of hours, the little ball should have spread and risen up to fill the entire bowl. Carefully take it out and cut into two. Now we want to make two balls without crushing the dough or kneading or squashing out any of those lovely air bubbles. Gently form the dough into a ball shape by folding the edges underneath. Now put these balls on a tray or on two separate plates with enough room to spread and cover with cling film again. We’re going to leave them overnight – at least 20 hours – and again, in a warm (or at least not cold) place.
- Yay! It’s pizza baking day. Are you excited? Wake up and rush to check your dough balls growth like it’s Christmas. Only start stretching out your dough when your oven is as hot as possible. Once the sauce is on the dough it starts being absorbed so we want to get these in the oven as soon as we’ve stretched them out and sauced them. Remember to put the tray you’ll be using in the oven so it heats up as well. Layer out a sheet of baking paper. Now gently take out one spread ball and stretch it in the centre, leaving the outer edges quite thick and rustic. NO NEED to use a rolling pin. Just stretch it gently and press any holes together with your fingers.
- Spoon some tomato passata onto your pizza dough circle, leaving the crust edges bare. I like to add a drizzle of olive oil and then pop this into the oven to cook until the edges are puffy and the centre of the pizza is almost completely cooked so that it can handle all the liquid that is going to come when we add our mozzarella. Also check underneath – how is the bottom doing? It should be firm and crisp and cooked through and the second cooking with the toppings is just to make it golden.
- Now that the crust has been partly baked, you can try to take the baking paper away and do the second cooking with the pizza directly on the hot tray, which helps in making it super crispy. I like to rub some olive oil over the crust to make it extra golden and croccante. Add your mozzarella and any other toppings and pop it back into the oven until the cheese is just going golden or until your partner or child or inner monologue cries out one too many times “Is it ready?!!! Can we finally eat it now PLEASE?!!” Top with fresh basil and as you’re devouring your first slice, debate what toppings you should put on the second pizza.
4 Comments